Plumb Line Posture: What Good Side-View Alignment Looks Like
In plumb line posture, a vertical line seen from the side runs through the ear canal and the middle of the shoulder, just behind the hip joint and just in front of the knee and ankle. That is the “ideal alignment” in Kendall’s posture manual: a reference, not a norm. In 136 healthy adults measured in 2017, the real line of gravity passed through the ear canal, as the ideal says, but about 5 cm in front of the ankle joint.
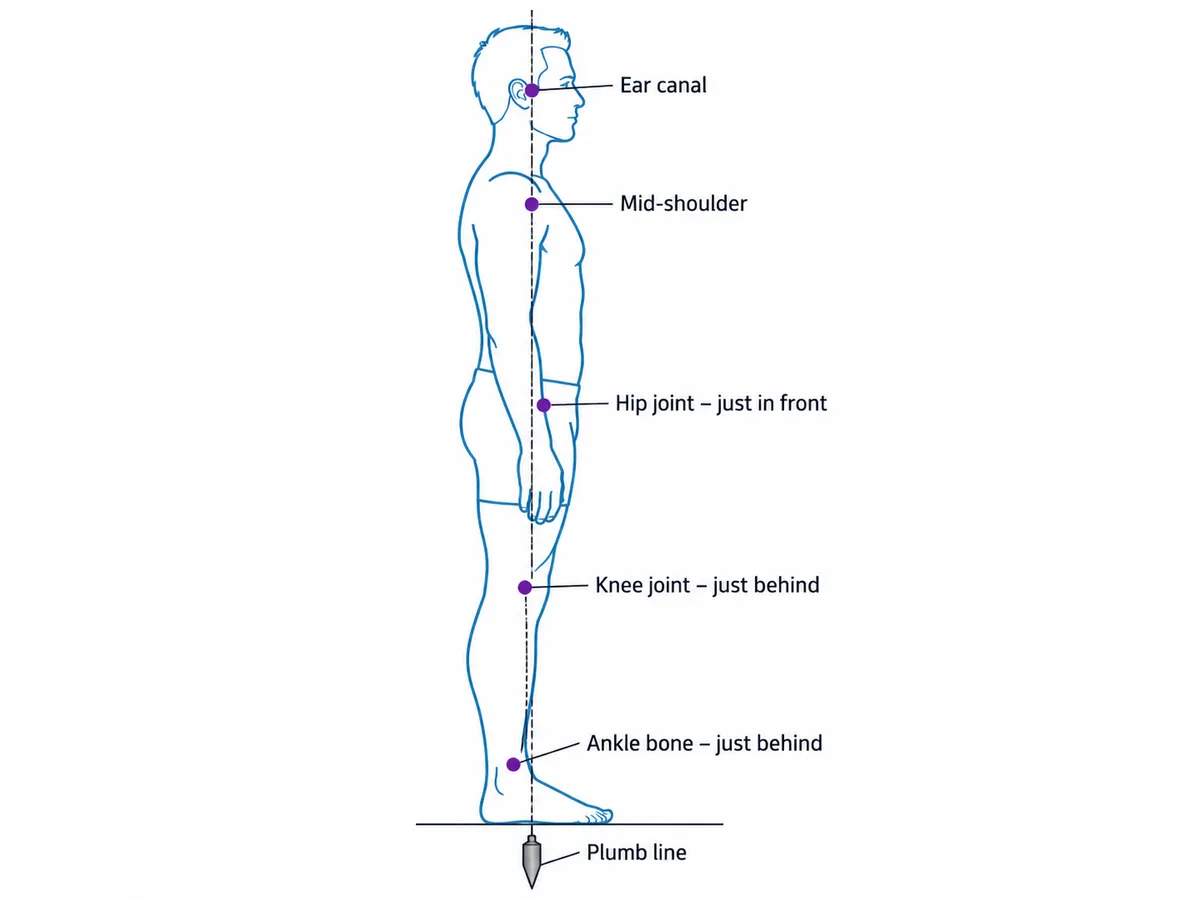
The plumb line checkpoints, from ear to ankle
A plumb line is a string with a weight, hung so it gives a true vertical. For the side view, the person stands beside it with the line just in front of the outer ankle bone (the lateral malleolus), and the examiner reads where each landmark sits relative to the line. A 2024 scoping review by Barra-López quotes the checkpoints of the manual’s “standard posture”, and a 2009 study by du Plessis and colleagues uses the same five. The table sets them beside measurements from 136 healthy adults aged 20 to 69, whose skeletons were X-rayed while they stood on a force plate that located their real line of gravity (Hasegawa et al., 2017).
| Kendall's ideal alignmentWhere the line passes | 136 healthy adultsAverage offset from the measured line of gravity | |
|---|---|---|
| Ear | Through the ear canal | Ear canals 0.0 cm from the line |
| Shoulder | Midway through the shoulder | Not measured in this study |
| Hip | Slightly behind the centre of the hip joint | Hip joints 1.4 cm in front of the line, and never behind it |
| Knee | Slightly in front of the knee joint | Knee joints 2.4 cm behind the line |
| Ankle | Slightly in front of the outer ankle bone | Ankle joints 4.8 cm behind the line |
The spine itself is not on the line. In the same study, the top of the upper-back curve (at the T7 vertebra) sat 5.0 cm behind the line of gravity, and the deepest point of the lower-back curve (L4) 0.6 cm in front of it.
An older photo study points the same way. Woodhull and colleagues (1985) photographed 15 people in profile in ordinary standing. In every one of them, the knee, hip, shoulder and ear were all in front of the ankle joint: on average the knee by 3.8 cm, the hip by 6.2 cm, the shoulder by 3.8 cm and the ear by 5.9 cm. The hip sitting about 6 cm in front of the ankle matches the X-ray study (1.4 cm plus 4.8 cm, our sum).
That has a practical consequence. Common advice says to keep your ear, shoulder, hip and ankle in a line, as a Canadian provincial health service’s posture page puts it. Taken literally, with the line drawn straight up through the ankle bone, ordinary standing looks like a forward lean, because the upper landmarks normally sit a few centimetres ahead of the ankle. Our suggestion is to start the line a few centimetres in front of the ankle bone, or to judge the ear, shoulder, hip and knee against each other and treat the ankle as the base.
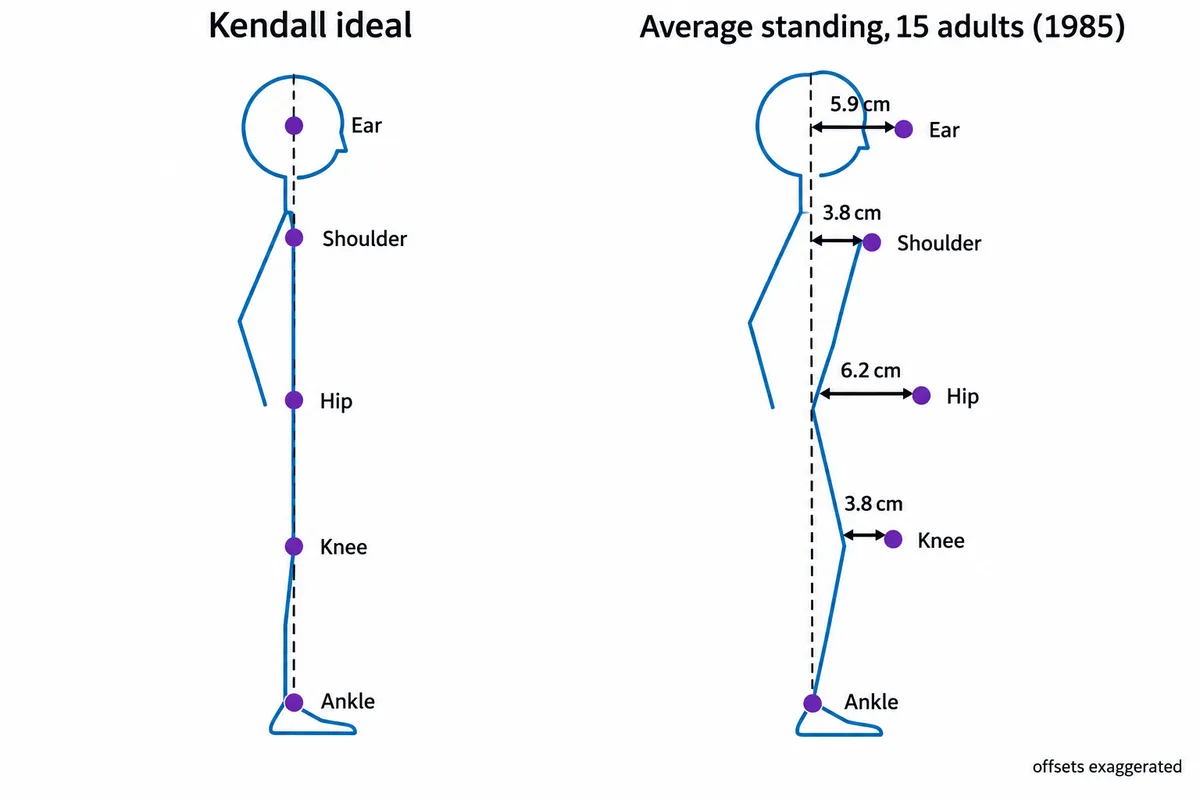
Why almost nobody matches the ideal
The ideal was never meant to describe the average person. In the 1952 first edition of Posture and Pain, the Kendalls and Boynton wrote that “the authors have not seen an individual who matches the standard in all respects”, a statement Barra-López notes was dropped from later editions. His review traces the standard posture to an 1836 design by the Weber brothers, who wanted a stance in which the bones could carry the body’s weight without help from the muscles. Real standing is not like that: people sway, and the muscles keep working.
Healthy people depart from the line all the time. Griegel-Morris and colleagues (1992) checked 88 healthy adults aged 20 to 50 against a plumb line and found a forward head in 66%, a rounded right shoulder in 73%, a rounded left shoulder in 66% and increased upper-back rounding (kyphosis) in 38%. Age moves people further away. In Hasegawa’s healthy volunteers, the neck curve, pelvic tilt and knee bend all increased with age, which the authors read as the body compensating for a stooping trunk to keep the eyes level. Barra-López concludes that judging older people against the ideal may produce many false positives.
Whether departures matter for pain is less settled. Griegel-Morris found that people with more severe postural abnormalities reported pain more often, but the severity of the abnormality was not related to how bad or how frequent the pain was. A 2020 review of 41 systematic reviews found associations between spine postures or physical exposures and low back pain, but no consensus that they cause it. In a survey of 544 physiotherapists, forward head posture was almost never chosen as the optimal standing posture, yet the authors note a lack of strong evidence that any specific posture is linked to better health outcomes. The fair reading: the plumb line is a useful way to describe how a body is stacked, and a departure from it is a description, not a diagnosis.
How to read your own side photo against the line
Judging a live plumb line by eye is harder than it looks. In the du Plessis study, 83 occupational therapy students read deviations from a plumb line on one life-size side photo. At the ear, their median estimate was 2.0 cm where posture-analysis software measured 9.9 cm, and the differences were statistically significant at the ear, shoulder, hip and knee, growing larger toward the head. A fixed reference also beats a hand-held one: in a 2024 study of 135 people with and without scoliosis, Roggio and colleagues found reliability above 0.90 (intraclass correlation) for a plumb line fixed to a stand, against about 0.70 for one held by hand, measuring distances from the line to the back of the spine. A level photo gives you that fixed reference and a record you can measure.
- Take a level side photo in your usual relaxed stance, with fitted clothes and your ear visible. The guide to taking posture photos covers camera height, level and distance.
- Draw a true vertical a few centimetres in front of the ankle bone, using a door frame or the camera grid to check it is vertical.
- Read each segment from the top.
- Ear ahead of the shoulder: the pattern described in the forward head posture guide, often called tech neck when linked to screen use.
- Hips well ahead of the line, shoulders behind them: the hips-forward pattern of clinical swayback posture.
- A deep lower-back arch with the pelvis tipped forward: see anterior pelvic tilt and lumbar lordosis. A flat lower back with a tucked pelvis points to posterior pelvic tilt.
- Knees well behind the line, or bent in front of it: a locked-back (hyperextended) or flexed knee. In the ideal, the knee joint already sits slightly behind the line, so look for a clear gap.
The home posture check guide covers what to look for in the front view.
What PosturaScreen measures from a side photo
PosturaScreen, the product behind this article, reads a side photo with a pose model that finds 17 body keypoints. On the side view it uses the ear, shoulder, hip, knee and ankle of whichever side it sees more clearly, which are the plumb-line checkpoints. They are points the model places on the photo, not bony landmarks a clinician feels for, and the report does not measure distances from a plumb line. Instead it reports six side-view metrics from the angles and offsets between those five points.
| What it compares | Plumb-line question | Report range | |
|---|---|---|---|
| Forward Head (approx) | Shoulder-to-ear line against vertical | Is the ear over the shoulder? | Under 12° |
| Ear-Shoulder | Horizontal ear-to-shoulder distance, scaled by assuming a 50 cm shoulder-to-hip torso | Is the ear over the shoulder? | Under 2.5 cm |
| Thoracic Kyphosis (approx) | Bend at the shoulder between ear and hip, plus a fixed 30° baseline | Are ear, shoulder and hip in line? | 20–45° |
| Lumbar Lordosis (approx) | Bend at the hip between shoulder and knee, plus the same baseline | Are shoulder, hip and knee in line? | 20–60° |
| Pelvic Tilt (approx) | Hip-to-knee line against vertical | Is the thigh vertical? | Under 12° |
| Knee Angle | Angle at the knee between hip and ankle | Is the leg straight? | 175–180° |
What do these formulas give for the bodies above? By our calculation, a body with all five points on one vertical line reads Forward Head 0°, Ear-Shoulder 0 cm, Thoracic Kyphosis 30°, Lumbar Lordosis 30°, Pelvic Tilt 0° and Knee Angle 180°. The average standing body from the 1985 photo study reads about 5–8° for Forward Head, 2.1 cm for Ear-Shoulder, 38–41° for Thoracic Kyphosis, 36° for Lumbar Lordosis, 3–4° for Pelvic Tilt and 178° for Knee Angle. Both sit inside every range. The average body is only 0.4 cm inside the Ear-Shoulder limit, though. In our reading, ordinary standing can tip Ear-Shoulder over its limit, so a flag on that metric alone is a reason to look at the photo and the trend rather than a finding.
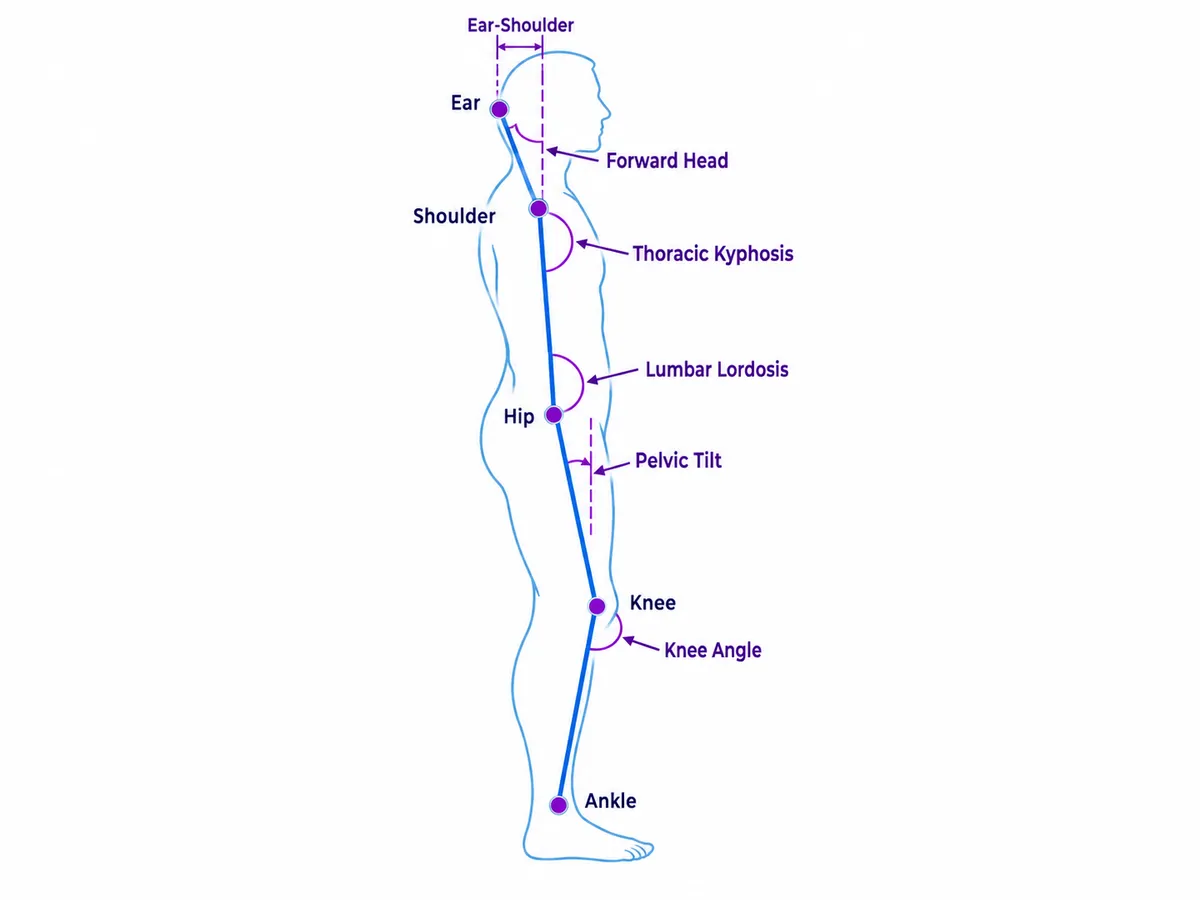
Three things from the formulas help when reading a report against the plumb line:
- The numbers have no direction. Forward Head, Ear-Shoulder and Pelvic Tilt grow the same way whether the ear or thigh is ahead of or behind vertical, and a Knee Angle below 180° can mean a bent knee or one locked back. The photo shows which way. Pelvic Tilt therefore cannot tell anterior from posterior tilt.
- Two metrics share the neck. When the shoulder sits straight above the hip, Thoracic Kyphosis equals Forward Head plus 30° (our reading of the formula), so a forward head raises both. Read them together rather than as two separate findings.
- The approx metrics are estimates. A flat photo cannot see the spine or the pelvis, so Forward Head, Thoracic Kyphosis, Lumbar Lordosis and Pelvic Tilt are best used to track the same person under the same setup. The methodology page lists every formula, the posture metrics glossary explains each metric, and how accurate photo posture analysis is covers the limits of 2-D estimates.
Use the line as a reference, not a target
Take one level side photo in your usual stance, mark where your ear, shoulder, hip and knee sit, and note which way any departure goes. If you have no symptoms, a departure from the line is something to track, not to fix on the spot: repeat the same photo setup in a few weeks and compare, as described in what to do after a posture screen. If you have back pain, the NHS advises seeing a GP when it has not improved after a few weeks of home treatment or stops you doing everyday activities, and a licensed physiotherapist, physician, or chiropractor can then put a side photo in context.
How this article was made: the study figures come from the papers linked in the text, opened in October 2026. The metric values for the vertical body and the 1985 average body are our own calculations from PosturaScreen’s published formulas, assuming a 50 cm torso, an ear about 20 cm above the shoulder point and a 40 cm thigh and shank; changing those lengths by 5 cm moves the angles by about 2° or less. The description of PosturaScreen’s metrics comes from its analysis code and the published methodology. It is for posture education, is not medical advice and is not a substitute for a clinical evaluation. PosturaScreen is a screening and tracking tool, not a diagnostic device. See our editorial standards for how articles are written.
Free posture screening, in seconds.
Start with one photo. Add the second for all 17 metrics. No account or app required.
Start a free posture screen