How to Take Posture Photos: Camera Height, Level, Distance and Clothing
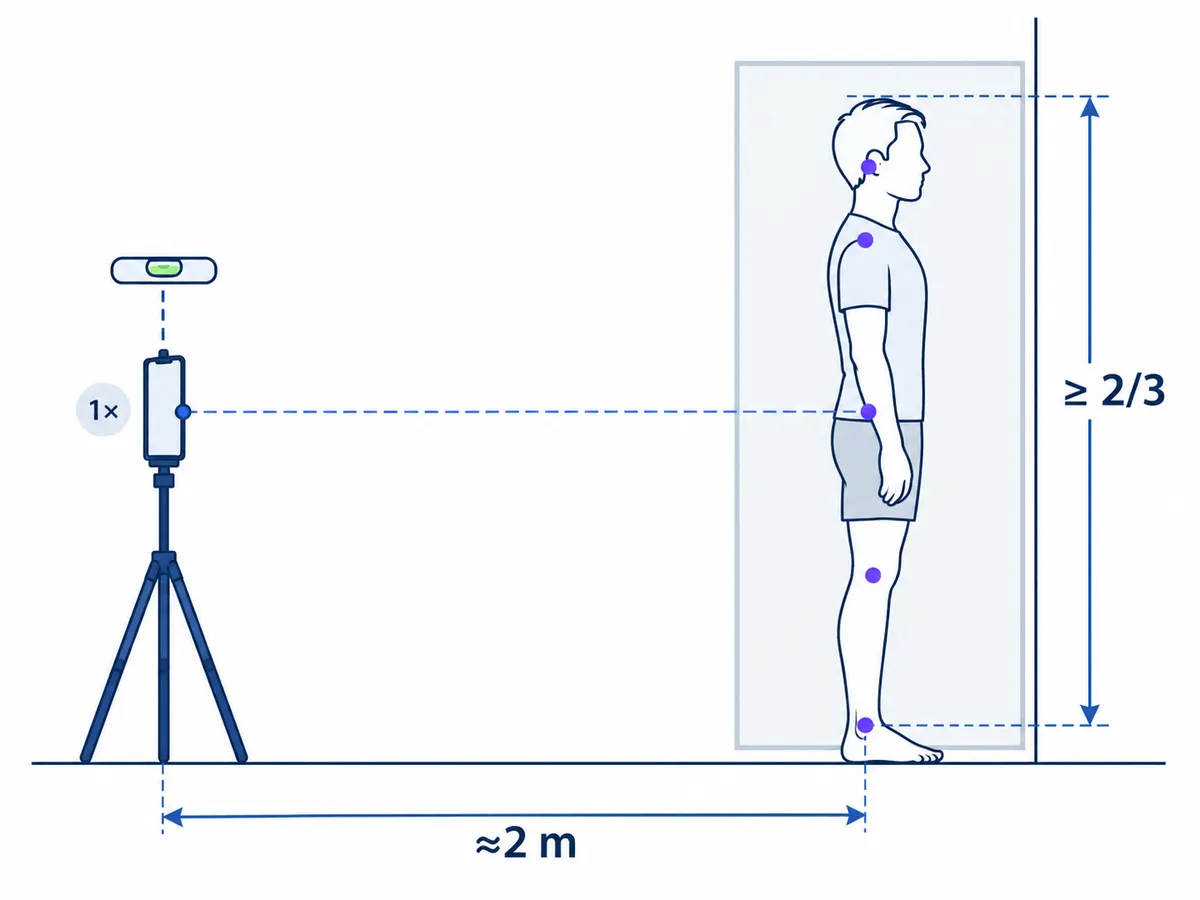
For a posture photo that measures well, prop your phone at hip height, keep it level, and stand back until your body fills about two-thirds of the frame height (roughly 2 m on 1× or 3 m on 2×, our estimate). Wear fitted clothes; take one photo facing the camera and one side-on. Level matters most: by our calculation from PosturaScreen’s formulas, each degree of sideways tilt shifts five angle readings by up to 1°, and about 2° can flag a symmetrical body as uneven.
What you need
You need a phone, something that holds it steady at about hip height (a tripod, a shelf or a stack of books), 2–3.5 m of clear floor in front of a plain wall, fitted clothes, and either the camera’s self-timer or a helper. One photo is enough to start a PosturaScreen report. A front photo gives the 11 front-view metrics, a side photo gives the 6 side-view metrics, and both together give all 17.
How to take posture photos, step by step
- Set up the space. Stand in front of a plain wall, with the light coming from behind the phone rather than from a window behind you.
- Place the phone at about hip height, upright, on a tripod or shelf.
- Level the phone. Turn on the camera grid or level, and check that a door frame or wall corner in the shot runs parallel to the vertical grid lines. A plumb line (a string with a small weight) at the edge of the shot does the same job, as in research protocols.
- Pick the lens and distance. Use 1× at about 2 m, or 2× at about 3–3.5 m if the room allows. Don’t use 0.5×.
- Mark the spots. Put tape where the phone stands and where your feet go, and write down the phone height and lens.
- Dress for the camera. Wear a fitted top with shorts or leggings, keep your ankles visible, tie long hair back so your ears show, and go barefoot or wear the same shoes each time.
- Take the front photo. Face the camera squarely with your feet about hip-width apart, arms hanging relaxed and empty-handed, eyes straight ahead. Stand the way you usually stand, and use the timer.
- Take the side photo. Turn 90° so your left side faces the camera, the side PosturaScreen asks for, and keep the same stance. The model measures whichever side it sees more clearly, so if your earlier photos show your right side, keep using the right.
- Check the frame before you run the analysis. Your head and feet must both be in the photo with a little space around them. If the photo leans, straighten it with the Rotate slider. If you look small, drag the crop box around yourself.
Why a level phone matters more than the exact height
Published posture photo protocols disagree about camera height. Research setups range from half the subject’s height to 1.2 m, 1.63 m in a validation study of posture-assessment software, and shoulder level in a neck-focused study.
The evidence points at level instead. In a 2018 reliability study of 24 men, Sieman and colleagues photographed each person with a camera levelled by spirit bubble, once at 70 cm and once at 100 cm, and found no significant effect of camera height on the posture measurements. That study shot from 7 m, so it can’t rule out an effect at phone distances. Watson’s 1998 procedure for posture photographs explains why level matters. When the lens is not vertical and parallel to the body, some body parts are magnified more than others, and that distortion goes away when the camera is precisely aligned. Hip height is still the practical default, because a level lens in the middle of the body frames you from head to feet without tipping the phone. At eye level, fitting your feet in usually means tilting the phone down. Whatever height you pick, use the same one every time.
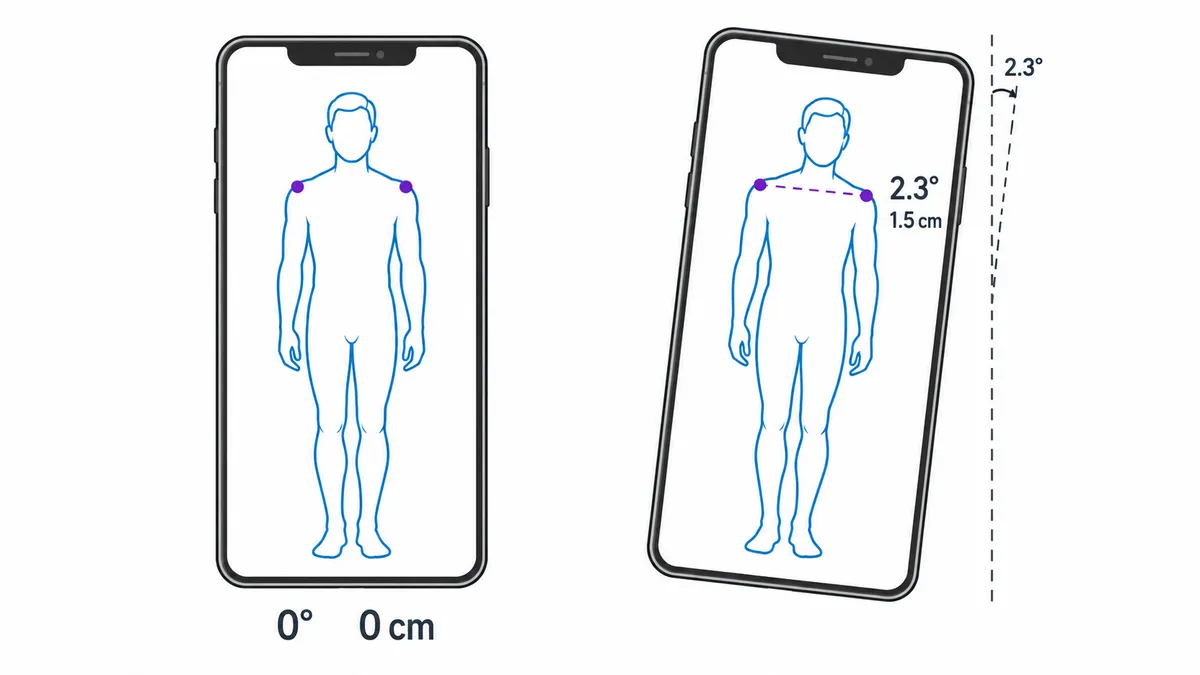
Sideways tilt is the other half of level. PosturaScreen measures several metrics against the photo’s own horizontal or vertical (the formulas are on the methodology page), so a phone rotated sideways shifts them even when your body hasn’t moved. The table is our calculation from those formulas, not a measurement on people. Distance and lens don’t change these figures, because the cm scale comes from your shoulder width in the photo.
| View | Effect of 1° of sideways phone tilt | |
|---|---|---|
| Head Tilt, Clavicle Angle, Waist Angle | Front | Up to 1° each |
| Shoulder Level | Front | Up to about 0.66 cm (38 cm × sin 1°). About 2.3° of tilt alone reaches the 1.5 cm screening limit. |
| Chest Symmetry | Front | Up to about 0.55 cm, the average of the shoulder and hip shifts. About 1.8° of tilt alone reaches its 1 cm limit, the first metric to flag. |
| Pelvic Level, Knee Alignment | Front | Up to about 0.45–0.5 cm each. About 2–2.3° of tilt alone reaches their 1 cm limits. |
| Arm Position | Front | Up to about 0.9 cm, because relaxed wrists hang wider than the shoulder points. A little over 2° alone reaches its 2 cm limit. |
| Forward Head, Pelvic Tilt | Side | Up to 1° each |
| Ear-Shoulder | Side | Up to about 0.3 cm with typical neck proportions, well inside its 2.5 cm limit |
| Q Angle, Foot Position, Thoracic Kyphosis, Lumbar Lordosis, Knee Angle | Both | No change, because these compare body points with each other, not with the frame |
In practice, that means keeping the phone within about a degree of level, which is our rule of thumb. Closer is better: 1° already uses about half of Chest Symmetry’s margin. The camera grid or level indicator makes this easy. A sideways tilt can also be repaired afterwards, because it only rotates the picture. The Rotate slider in PosturaScreen’s photo editor turns a photo by up to 15° either way, so line a door frame up with the vertical before you run the analysis. A phone tipped up or down can’t be repaired that way, because tipping changes how much each part of the body is magnified, not just the angle of the picture.
How far away to stand, and which lens to use
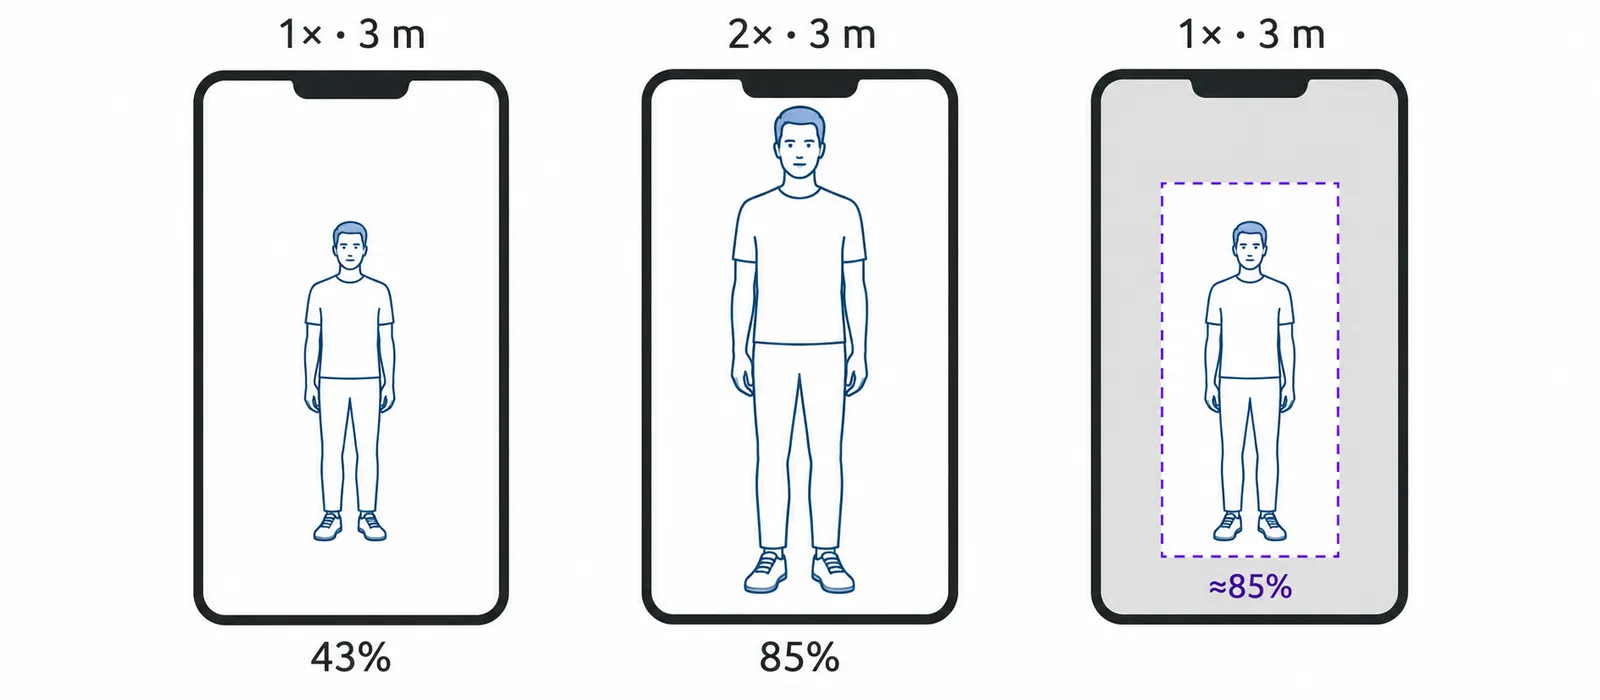
Distance trades perspective against size. Watson’s procedure notes that body parts closer to the camera come out larger than parts farther away, and that this parallax error shrinks as the camera moves farther back. A longer lens is what lets you move back and still fill the frame. On a phone, that means stepping back and using 2× rather than standing close on 1×. Avoid the 0.5× ultra-wide lens: it forces you close to the camera and puts your head and feet at the edges of the frame, where Watson notes lens distortion bends straight lines.
Size matters because PosturaScreen flags a photo when the nose-to-ankle span covers half the image height or less. That span is roughly 85% of your height (our estimate from PosturaScreen’s sample photos), so your whole body needs to fill about 60% of the frame to pass. The table shows how much of an upright photo a 1.70 m person fills, using the focal lengths published for a current phone (26 mm for 1×, 52 mm for 2×). Other phones differ slightly, and the figures are our calculation.
| Frame height | A 1.70 m person fills | |
|---|---|---|
| 1× at 2 m | About 2.7 m | About 64%, just enough |
| 1× at 3 m | About 4.0 m | About 43%, flagged unless you crop |
| 2× at 2.5 m | About 1.7 m | Head or feet cut off |
| 2× at 3 m | About 2.0 m | About 85% |
| 2× at 3.5 m | About 2.3 m | About 73% |
Our rule of thumb is to fill at least two-thirds of the frame height and still leave space above your head and below your feet. A validation study of posture-assessment software left about 0.5 m free above and below each subject (Ferreira et al., 2010), which works out at about 63% for a 1.70 m person. The share scales with height: a 1.55 m person needs to stand about 1.8 m away on 1× to fill the same 64%. If you end up small in the frame anyway, drag the crop box tight around yourself in the editor. Only the cropped area is analysed, so the full-body check is measured against the crop. Resolution matters less than framing: the Sieman study above found no significant effect of image resolution (5.2 to 21 megapixels) on its measurements.
What to wear and how to stand
PosturaScreen’s pose model finds 17 body points: eyes, ears, nose, shoulders, elbows, wrists, hips, knees and ankles. It has no points on the feet. Loose clothing hides where those joints are. In a 2022 study of athletes in loose snow-sports clothing, Yamaguchi and colleagues reported that neither manual annotation nor a state-of-the-art pose estimator reliably found the correct joint positions. Fitted clothes keep the hips and knees findable. Tied-back hair keeps the ear visible, and the ear is where Forward Head and Ear-Shoulder are measured from. Watson adds that clothes should sit symmetrically: a waistband higher on one side can make a level body look uneven. Wearing the same shoes each time, or none, keeps your stance comparable. Many research protocols stick small markers on bony landmarks; PosturaScreen’s model doesn’t use markers, so you don’t need them.
Stand the way you usually stand, not in what feels like your best posture. Posing records how well you can stand when you try, and a later photo then depends on how hard you tried that day. For tracking, PosturaScreen asks for the relaxed, habitual stance. Watson’s standard pose differs: stand as well as you can, heels or knees together. It records your best effort rather than your usual stance, so pick one and keep it. Keep your feet about hip-width apart and in the same place each time. Practitioners who want tighter control can fix the heel distance, as one AI posture study did at 20 cm.
Troubleshooting: photo-quality notes and numbers that jump
The report shows a photo-quality note. PosturaScreen runs two automatic checks. One flags a low average detection score for the main body points, which usually means poor light, blur or something covering the body. The other flags a nose-to-ankle span of half the image height or less. Fix the first with even light and fitted clothes, and the second with a crop, 2× or a step closer.
The app says “No human detected”. It couldn’t find a person in the photo. The step-by-step guide covers the usual causes, which are a cut-off head or feet, a busy background, strong backlight and baggy clothing.
Your numbers changed between sessions. PosturaScreen does not check camera height, tilt, distance, clothing or stance, so compare your setup notes before you compare the reports. Studies with fixed protocols show what consistency buys. With a phone on a tripod at a set height and distance and a relaxed-stance instruction, Mylonas et al. (2025) reported intraclass correlations of 0.98 between and within examiners in 30 students, for three angles measured from skin markers. Five metric types (Forward Head, Thoracic Kyphosis, Lumbar Lordosis, Pelvic Tilt and Q Angle) are tagged approx because they estimate a 3-D angle or curve from a flat photo. They are best read as a same-person trend, as explained in how accurate photo posture analysis is.
Repeat the setup every time
Before you take the next set, copy your notes from the first one: the tape marks, phone height, lens, the side you photographed, your clothes and where the light came from. With the setup unchanged, a difference between two reports is far more likely to come from you than from the camera. To read the photos themselves, the guide to checking your posture at home explains what to look for from the front and the side, and the 17 posture metrics, explained covers each number in the report.
How the numbers in this article were worked out: the tilt and framing figures are our own calculations from the formulas on PosturaScreen’s methodology page, typical keypoint spacings and proportions read from the keypoints on PosturaScreen’s sample front and side photos, and the published focal lengths of a current phone’s 1× and 2× cameras. They were not measured on people.
This article was prepared by the PosturaScreen editorial team for posture education. It is not medical advice and is not a substitute for a clinical evaluation. PosturaScreen is a screening and tracking tool, not a diagnostic device. If you have concerns about your posture or musculoskeletal health, consult a licensed healthcare professional. See our editorial standards for how this article was written and reviewed.
Free posture screening, in seconds.
Start with one photo. Add the second for all 17 metrics. No account or app required.
Start a free posture screen