Static Postural Assessment: Steps, Landmarks and What to Record
A static postural assessment is a structured look at a client’s relaxed standing alignment from the front, side and back, against a vertical reference such as a plumb line. Its value depends on what you record. In two studies, clinicians’ ratings of spinal curves as normal, increased or decreased barely agreed between raters (kappa 0.13–0.16), while angles measured from marked photos agreed between raters with ICCs above 0.97. Below are the steps, the landmarks per view, and a record that makes re-tests comparable.
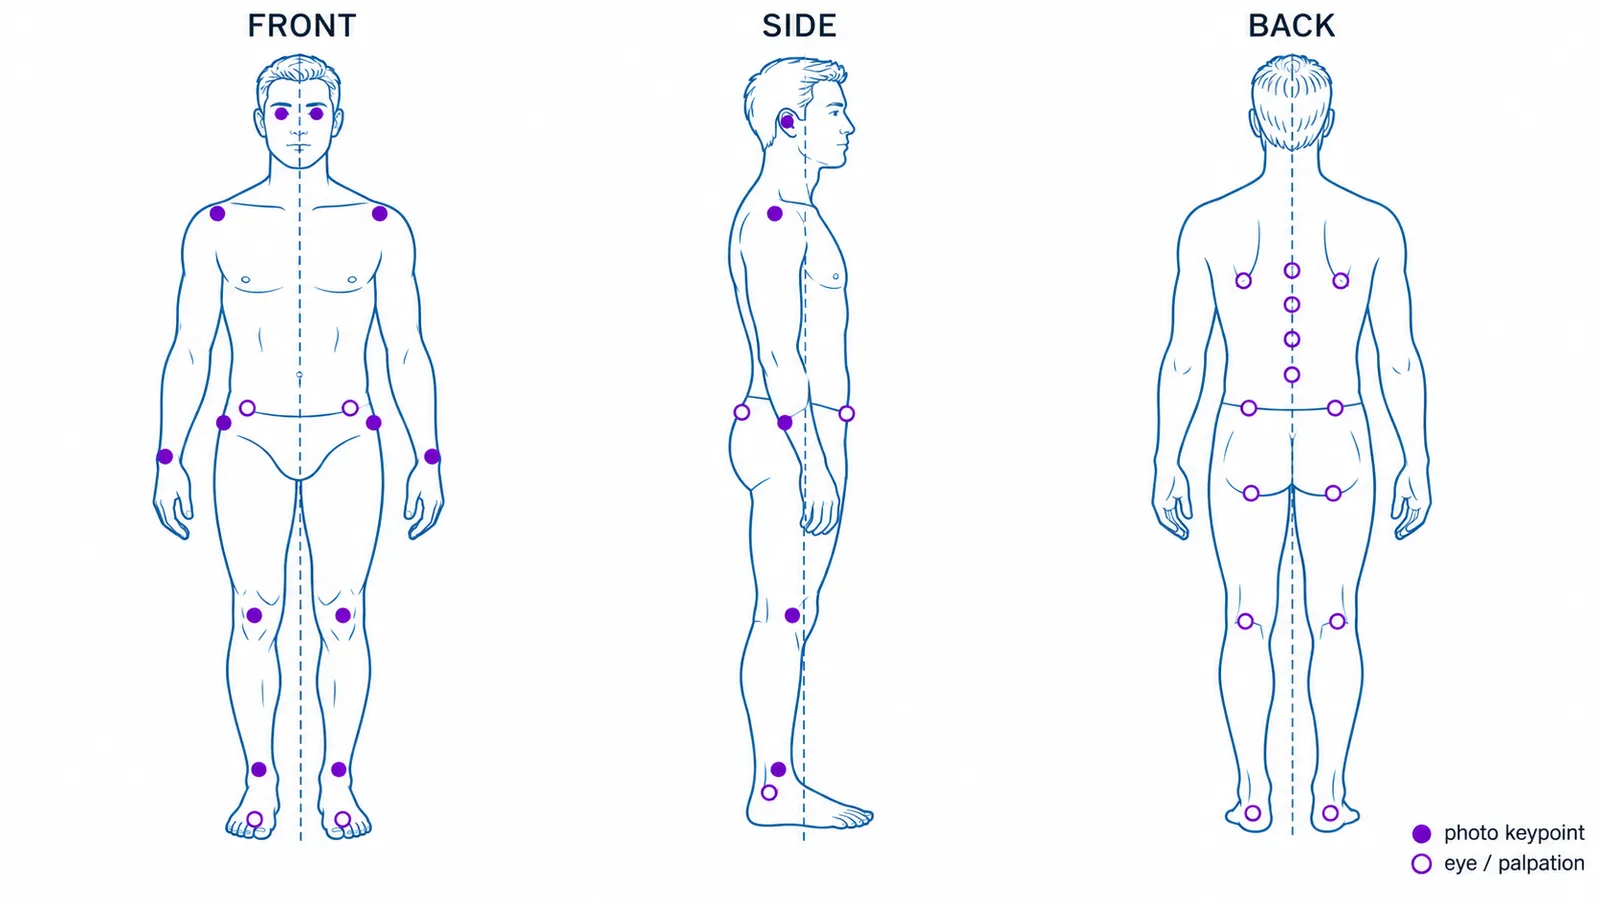
What a static assessment can and can’t tell you
A static postural assessment records how a person habitually stands. It doesn’t show how they move, and it doesn’t explain symptoms on its own. The American College of Sports Medicine’s introductory guide to assessing static posture (Fairall, 2023) treats static findings as possible signs to confirm with movement tests such as the overhead squat, the single-leg squat and gait analysis.
Two findings from the research should shape how you word what you see. The first is that the plumb-line ideal is a reference, not a norm. Kendall’s standard runs the line through the external auditory canal, midway through the shoulder, slightly behind the hip joint centre, slightly in front of the knee joint axis and slightly in front of the lateral malleolus. A 2024 scoping review in the Journal of Rehabilitation Medicine points out that Kendall’s first edition said its authors had never seen anyone who matched the standard in every respect. The review concludes that using the standard to identify postural deficiencies is not supported by current evidence and may produce many false positives, particularly in older people. In one study it cites, 66% of 88 adults without symptoms had a forward head position.
The second is that the link from posture to pain is unsettled. An umbrella review of 41 systematic reviews (Swain et al., 2020) found no consensus that spinal postures or physical exposures cause low back pain. In upper crossed syndrome, a 2026 meta-analysis of 28 trials found that corrective exercise changed the measured angles, while its effects on pain and function were inconsistent. So write a finding as a measurement or a description, such as “ear 4 cm in front of the acromion”, and keep the interpretation as a hypothesis to test.
What you need
You need a plain wall, a vertical reference (a plumb line hung from the ceiling, a posture grid, or a door frame in the photo), tape to mark where the feet go, a phone or camera on a tripod, a record form, and enough floor for the client to stand about 2 m from the camera. The ACSM guide asks clients to wear fitted shorts and a fitted top and to take their shoes off. Get consent for photographs and, separately, for palpation; the Pilates Association Australia guideline makes touch conditional on the client’s permission. Research protocols that measure angles by hand put small markers on bony landmarks. PosturaScreen’s pose model works from unmarked photos.
How to do a static postural assessment, step by step
- Take the history first. Know the complaint before you look, so the assessment answers a question instead of producing a list of deviations.
- Set up the camera. Put the tripod at the client’s hip height, level, about 2 m away on the 1× lens, facing the plain wall. The posture photo setup guide explains why level matters more than exact height.
- Mark the feet. Tape a spot where the client’s feet sit under the hips and face forward, the stance the Pilates Association Australia guideline describes. Write down the camera height and distance.
- Settle the client into a habitual stance. Ask them to stand as if they were “waiting for an elevator”, the ACSM guide’s cue, with arms relaxed and eyes ahead. Avoid “stand up straight”: it records their best effort, not their usual posture.
- Assess the front view. Align the vertical reference so it splits the feet evenly and runs up the midline; the ACSM guide aligns it with the pubis. Keep your eyes level with the region you are checking, then take the photo.
- Assess the side view. Turn the client 90° and align the line just in front of the lateral malleolus. Use the same side at every visit.
- Assess the back view. Turn the client to face the wall and look at the scapulae, the spinous processes, the pelvis and the heels. Photograph it if you will compare it later. The Pilates Association Australia guideline notes that a lateral curve of the spinous processes may indicate scoliosis; if you are a coach or trainer, refer the client to a clinician instead of interpreting it.
- Palpate to confirm. With consent, palpate the iliac crests, the ASIS and PSIS, and the inferior angles of the scapulae to check heights you could only estimate by eye.
- Record, then test in movement. Fill in the record described below before you interpret anything, then check each hypothesis with the movement and range-of-motion tests you normally use.
Landmarks to check in each view
The table lists the landmarks that the ACSM guide, the Pilates Association Australia guideline and Kendall’s line have in common, with what to write down for each. The last column shows which ones a two-photo tool can measure. PosturaScreen, the product behind this article, finds 17 body points (eyes, ears, nose, shoulders, elbows, wrists, hips, knees and ankles) in a front and a side photo and computes 17 metrics from them, 11 from the front view and 6 from the side view. It has no points on the feet, the scapulae, the spinous processes or pelvic landmarks such as the ASIS and PSIS.
| What to record | Measured from photos by PosturaScreen | |
|---|---|---|
| Front · Head (eye line) | Tilt of the eye line in degrees; any rotation | Head Tilt |
| Front · Shoulders (acromion) | Height difference and which side is higher | Shoulder Level (cm), Clavicle Angle (°) |
| Front · Arms and hands | Gap between arm and trunk; wrist or fingertip level | Arm Position (wrist height difference) |
| Front · Trunk | Sideways lean or shift of the trunk | Waist Angle |
| Front · Pelvis (iliac crests, ASIS) | Height difference, confirmed by palpation | Pelvic Level, from the hip joint points, not the ASIS |
| Front · Knees (patellae) | Height, direction of the patellae, valgus or varus | Knee Alignment (height), Q Angle left and right (approx) |
| Front · Ankles and feet | Malleoli, arch height, pronation or supination | Not measured. Foot Position compares the two shin angles; there are no foot points |
| Side · Ear (external auditory canal) | Horizontal distance from the vertical line or from the acromion | Forward Head (approx), Ear-Shoulder (cm) |
| Side · Thoracic and lumbar curves | Shape of each curve, described or measured | Thoracic Kyphosis, Lumbar Lordosis (approx proxies from joint angles, not Cobb angles) |
| Side · Pelvis (ASIS, PSIS) | Direction and amount of tilt, confirmed by palpation | Pelvic Tilt (approx), amount only: it can't tell anterior from posterior tilt |
| Side · Knee | Position relative to the line; hyperextension or flexion | Knee Angle |
| Side · Lateral malleolus | Where the line starts | Not measured |
| Back · Scapulae | Height of the inferior angles, distance from the spine, winging | Not measured: PosturaScreen uses front and side photos only |
| Back · Spinous processes | Any lateral curve | Not measured |
| Back · PSIS, gluteal folds, knee creases | Height differences | Not measured |
| Back · Heels | Inversion or eversion of the calcaneus | Not measured |
In practice, the head, shoulder, trunk, hip and knee rows of the front and side views can come from two standardized photos. The back view, the feet and anything you palpate stay manual. A photo tool supports a static assessment; it doesn’t replace one. Each metric is explained in the 17 posture metrics glossary.
Why record measurements instead of ratings
The table below collects the reliability studies that matter for the record. The first three asked clinicians to rate posture by eye; the last two measured angles from photos with markers on the skin.
| What was assessed | Agreement between raters | |
|---|---|---|
| Visual rating · Fedorak et al., 2003 | Cervical and lumbar lordosis rated normal, increased or decreased from photos of 36 people by 28 clinicians | Kappa 0.16 (poor); same rater 0.50 |
| Visual grading · Harvie et al., 2024 | Lumbar lordosis graded 0–3 from 3D scans of 50 people by 10 physiotherapists | Kappa 0.13 (slight); same rater 0.56; 83% of disagreements within one grade |
| Visual rating · O'Leary et al., 2015 | Scapular posture in 15 people with neck pain, rated by 4 physiotherapists | Kappa 0.37 (slight to moderate) |
| Measured from photos · Hazar et al., 2015 | Side-view angles from marked photos of 30 adolescents, 2 observers | ICC above 0.97; test-retest above 0.77 |
| Measured from photos · Mylonas et al., 2025 | Craniovertebral angle, swayback and knee hyperextension from marked photos of 30 students, 4 physiotherapists | ICC 0.98–0.99 between examiners; 0.95–0.99 for one examiner a day later |
The pattern is consistent. When clinicians sort posture into categories by eye (Fedorak et al., Harvie et al., O’Leary et al.), a second clinician often sorts it differently, while angles measured from marked photos repeat well (Hazar et al., Mylonas et al.). Iunes and colleagues (2009) tested both methods on the same 21 volunteers. The examiners using photogrammetry agreed on every segment, while the visual assessors disagreed on several landmarks, including the acromioclavicular and sternoclavicular joints, the iliac spines and the inferior angle of the scapula. Harvie’s team adds a fair qualification: most of their between-rater disagreements were within one grade, so visual raters are closer than kappa suggests.
Not every source draws the same conclusion. A 2022 systematic review of 41 studies of standing and sitting posture assessment (Woldendorp et al.) made a tentative recommendation, on moderate evidence, for direct visual observation of global posture by a trained observer using a rating scale. What tips the choice is what the record is for. Our rule: for a one-off impression within an examination, a structured rating scale used by a trained observer is enough. For anything you will compare between visits or between clinicians, or show a client as progress, measure from standardized photos and record the setup.
Photo measurement has limits of its own. In the validation of a free posture-assessment program (Ferreira et al., 2010), 14% of the variables had unacceptable reliability between raters, mostly those measured against the vertical line. A 2022 systematic review of forward head measurement found photogrammetry consistently reliable, but the evidence for its validity was not conclusive. That is why PosturaScreen tags five metric types approx (Forward Head, Thoracic Kyphosis, Lumbar Lordosis, Pelvic Tilt and Q Angle): they are 2-D estimates for tracking the same person, not substitutes for imaging. The research is summarized in how accurate photo posture analysis is.
What to record
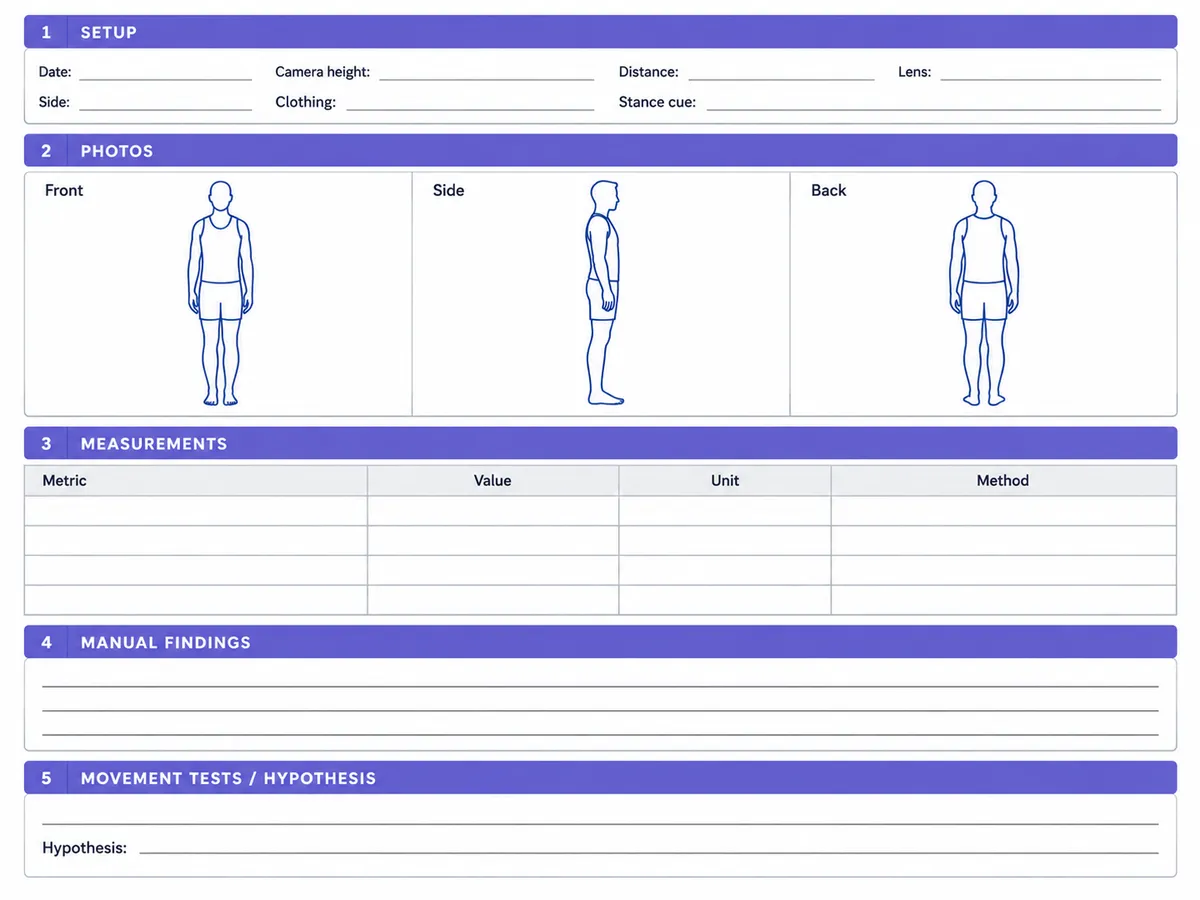
A record that another clinician could repeat has five parts:
- Setup: the date, camera height and distance, lens, the side photographed, clothing and footwear, and the stance cue you gave.
- Photos: front, side and, if you use it, back, taken from the marked spots.
- Measurements with units and method: for example “Shoulder Level 1.2 cm, right higher, from photo”, not “R shoulder high”.
- Manual findings: what you saw or palpated that the photos can’t show, such as scapular position, foot posture or a palpated difference in iliac crest height.
- Movement findings and hypothesis: the movement tests you ran, and what you think the static findings mean for this client’s complaint, written as a hypothesis.
Keep the flags on a screening report in their place: normal ranges are screening thresholds, not diagnoses. In PosturaScreen’s sample report, made for a fictional client, Ear-Shoulder reads 4.0 cm and is flagged against its < 2.5 cm range, while Forward Head reads 11.1°, just inside its < 12° range, although both come from the same ear and shoulder points. Write down both values instead of “forward head: yes” or “no”.
In PosturaScreen, each saved assessment’s photos and metrics are stored under the client’s record. It has no clinician-notes field, so the setup details, manual findings and your hypothesis belong in your own clinical notes.
Re-assessing: when is a change real?
Repeat the setup from the record: the same floor marks, camera height, distance, side, clothing and stance cue. Then compare the change with the measurement error of your method. Published error figures are rare and specific to each method. For a phone app that measures the craniovertebral angle from marked side photos, Gallego-Izquierdo et al. (2020) found a minimum detectable change of 4.5–5.9° in 44 young adults, so a smaller change could be measurement noise. That figure belongs to that app and protocol, not to other methods.
Where no error estimate exists for your method, repeated photos can help you check how consistent the setup is. At the first visit, take the photo set twice, with the client stepping off the marks and back on in between, and record both results. Their difference is only an observation from those two captures; it does not establish the method’s measurement error or a threshold for real change. A later value outside that pair’s range does not, by itself, establish a real change.
PosturaScreen’s progress comparison puts two saved assessments side by side so you can inspect their values and differences. A displayed difference does not establish improvement, deterioration or a change beyond measurement error. Consider the capture setup and repeated observations rather than treating a small numerical difference as proof.
Before your next intake
Fix three things before your next new client: the floor marks and camera position, the stance cue you will use every time, and a record template with the five parts above. Take duplicate photo sets at that first assessment to document how much those particular captures vary, without treating that difference as a threshold for real change. For the photo part, PosturaScreen measures the front and side views; the clinic workflow page shows how it fits a practice, and the guide to adding posture screening as a paid service covers where it sits in a visit. Pro costs A$19.90 a month for unlimited client records and assessments; Clinic pricing is Custom.
This article was prepared by the PosturaScreen editorial team for practitioners. It is general information, not medical advice, and it does not replace a clinical examination. PosturaScreen is a screening and tracking tool, not a diagnostic device. See our editorial standards for how this article was written.
A faster posture workflow for your clinic.
Two photos, an objective report, and no new hardware. AI analysis usually finishes in seconds after capture.
See the clinic workflow